Title: Cavicchio Jukebox - Finally Done !
Post by: caesar on December 06, 2009, 05:03:53 AM
Post by: caesar on December 06, 2009, 05:03:53 AM
Hello & Happy Holidays!
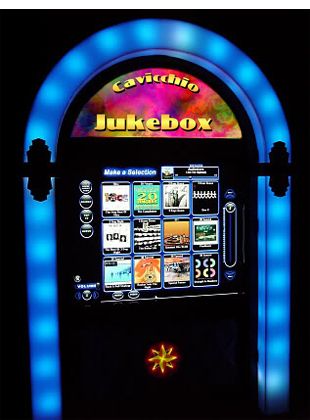
Well I finally finished my 1st Jukebox project !
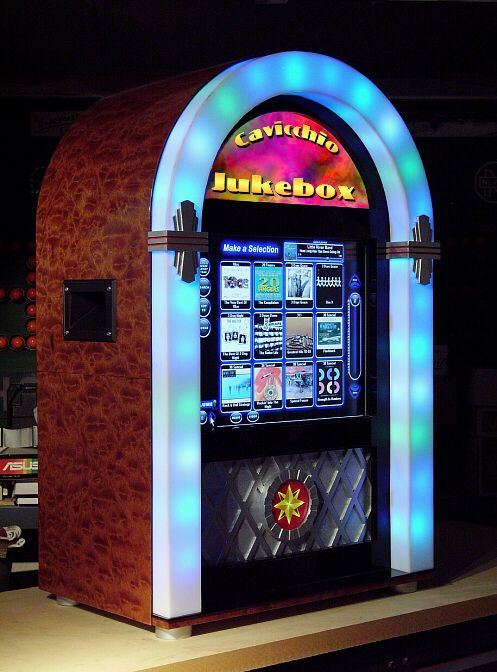
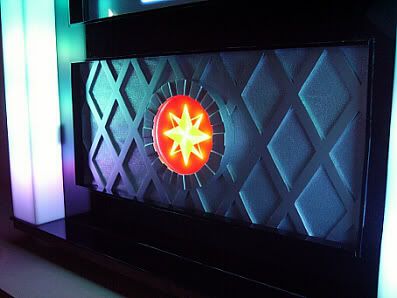
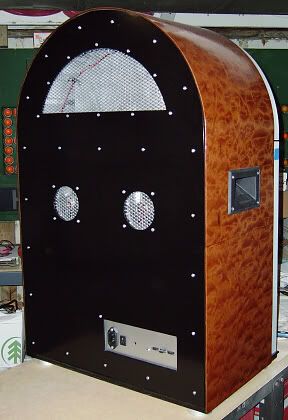
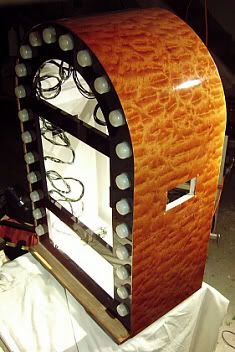
The entire cabinet was hand made by myself. (150+ photos). Since this wasn't a kit, the plastic arch had to be hand formed by myself from sheets of white polycarb. Black Plexi covers the enitre cabinet front.
Dimensions are approx. 32" H x 20" W x 13" D (inches).
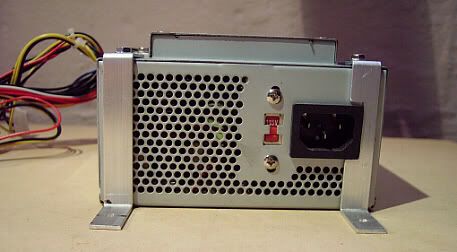
I utilized an older P4-3ghz Processor, 1Gig ram, 256mb AGP card, 300 watt power supply running Windows XP.
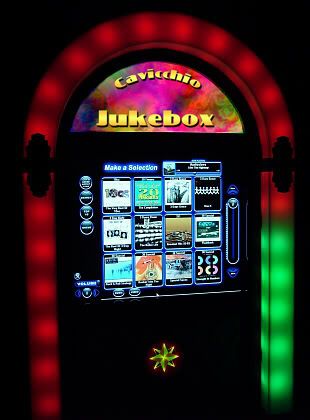
Created all the graphics using a trial version of Photoshop CS4.
I'm sure we all recognize the software. ;D
17" ELO Touchscreen purchased used on Ebay.
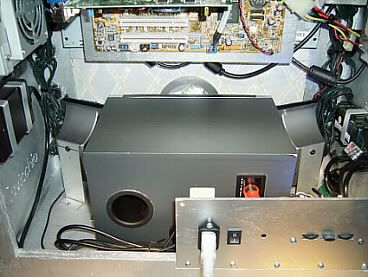
Audio is a standard 2.1 computer speaker set-up. I think it's 18W sub + 3W per channel. (pretty loud for home use)
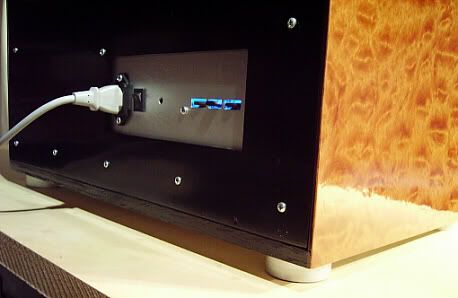
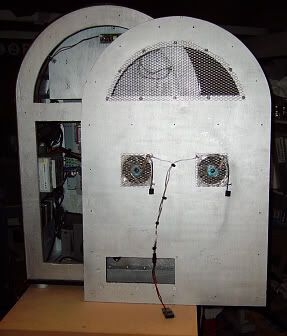
Master volume & bass controls on back panel.
Since I didn't have access to a vacuum press, and I'm a newbie with veneer, it took 2 attempts to get the veneer wrinkle & bubble free.
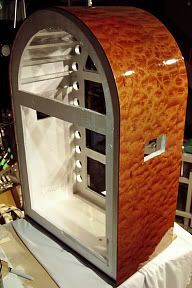
As you can see, I kept the design of a Wurlitzer 1015 in mind. Sorry no bubbles tubes, maybe next time.
A special thanks to all those members who took the time to answer my endless stream of questions. It surely helped.
Enjoy the pics !
Barry B. Your software is wonderful...
Happy Holidays!
Well I finally finished my 1st Jukebox project !
The entire cabinet was hand made by myself. (150+ photos). Since this wasn't a kit, the plastic arch had to be hand formed by myself from sheets of white polycarb. Black Plexi covers the enitre cabinet front.
Dimensions are approx. 32" H x 20" W x 13" D (inches).
I utilized an older P4-3ghz Processor, 1Gig ram, 256mb AGP card, 300 watt power supply running Windows XP.
Created all the graphics using a trial version of Photoshop CS4.
I'm sure we all recognize the software. ;D
17" ELO Touchscreen purchased used on Ebay.
Audio is a standard 2.1 computer speaker set-up. I think it's 18W sub + 3W per channel. (pretty loud for home use)
Master volume & bass controls on back panel.
Since I didn't have access to a vacuum press, and I'm a newbie with veneer, it took 2 attempts to get the veneer wrinkle & bubble free.
As you can see, I kept the design of a Wurlitzer 1015 in mind. Sorry no bubbles tubes, maybe next time.
A special thanks to all those members who took the time to answer my endless stream of questions. It surely helped.
Enjoy the pics !
Barry B. Your software is wonderful...
Happy Holidays!
Title: Re: Cavicchio Jukebox - Finally Done !
Post by: Novalak on December 06, 2009, 08:02:42 PM
Post by: Novalak on December 06, 2009, 08:02:42 PM
upload to an image host and attach the files here
Title: Re: Cavicchio Jukebox - Finally Done !
Post by: caesar on December 07, 2009, 05:23:25 AM
Post by: caesar on December 07, 2009, 05:23:25 AM
Here's the finished pics !

Title: Re: Cavicchio Jukebox - Finally Done !
Post by: caesar on December 07, 2009, 05:41:53 AM
Post by: caesar on December 07, 2009, 05:41:53 AM
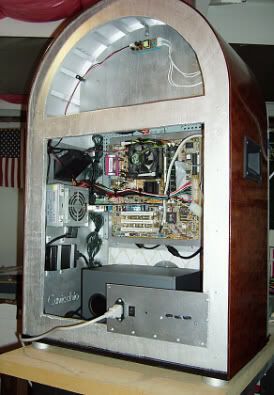
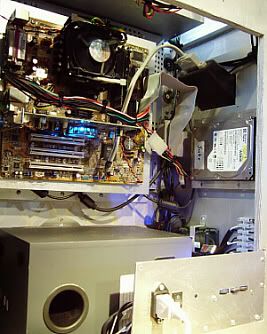
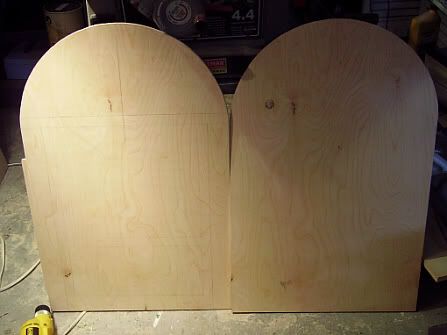
Here's the build... Please wait for pics to load...
Thanks!
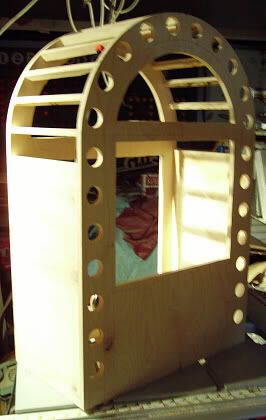

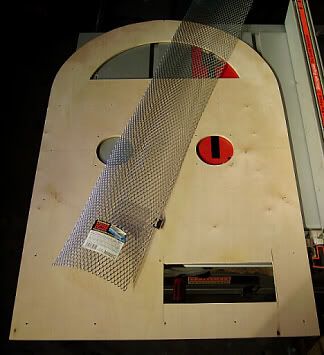
$1.99 Gutter Guard Screen for venting.
My 2nd piece of veneer. :( I guess you could say the first piece was a test...
Did you know that most wood veneer is only 1/42 of an inch thick?
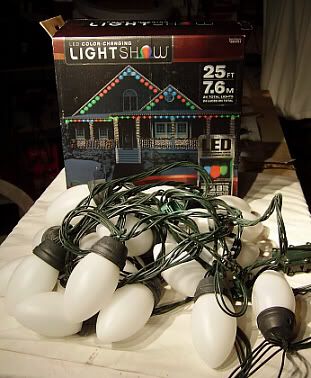
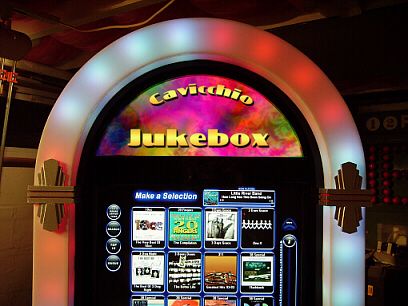
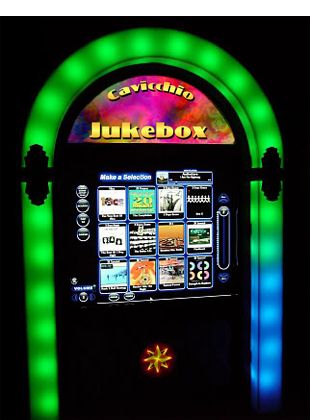
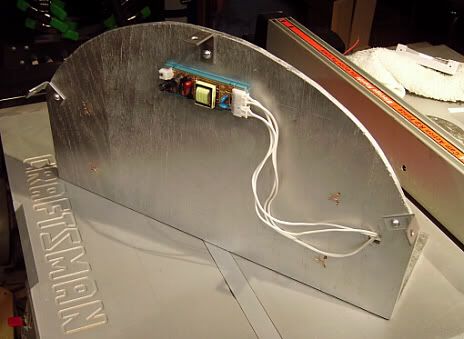
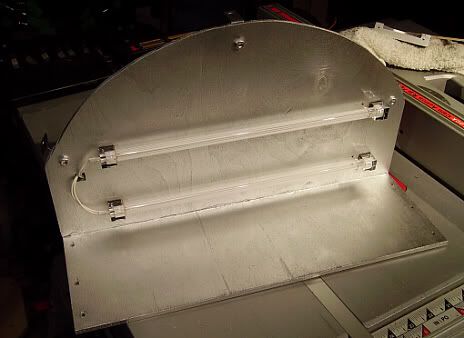
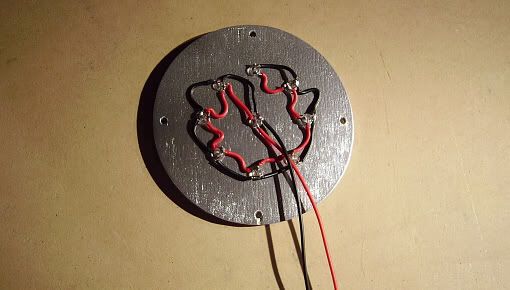
I found these 50% off after Christmas @ Lowes last year. I just removed the outer lightbulb shaped plastic to make them fit. Alot cheaper than a custom programmable controller. (maybe down the road I'll upgrade)
Cavicchio Jukebox - Lighting Demo (http://www.youtube.com/watch?v=IUj86nOrRxIDTK9Y#)
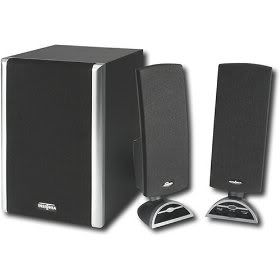
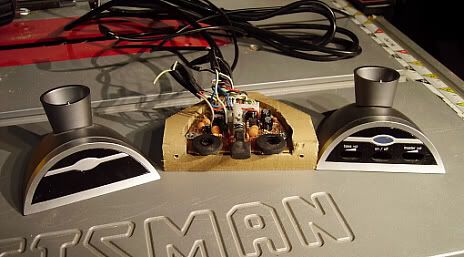
Forgot to take a photo of the speakers before I disassembled them. So I included the mfg. photo.
I actually cut down the height of the left & right speakers.
Removed the volume/bass control from the speaker's base and made a new holder that I'll be relocating in the back.
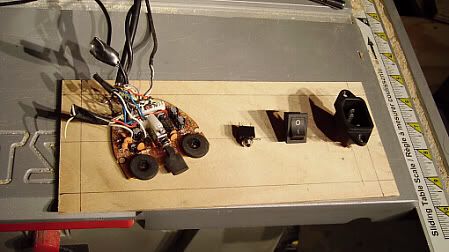

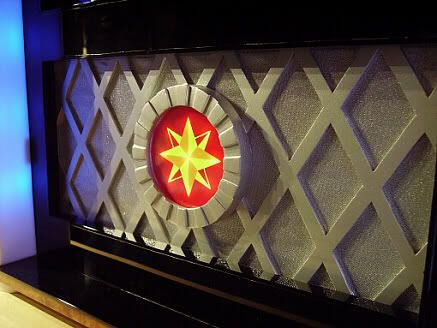
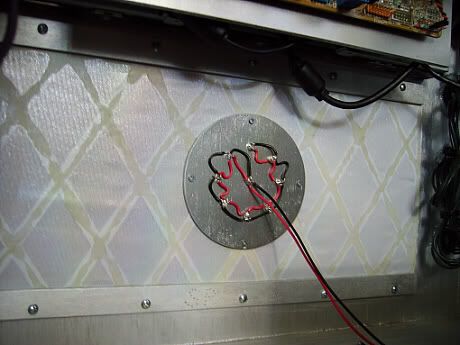
The flashlight originally ran on (3)1.5 volt batteries or a total of 4.5 volts.
By inserting a 15ohm resistor, I was able to power the front emblem directly from the 5VDC tap coming from computer's power supply.
That Chinese flashlight put up one good fight.
Where else can you buy 9 white Leds & 3 AAA batteries for $2.00 ?
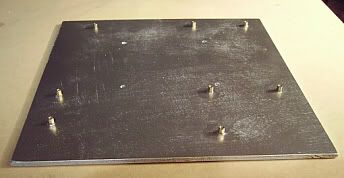
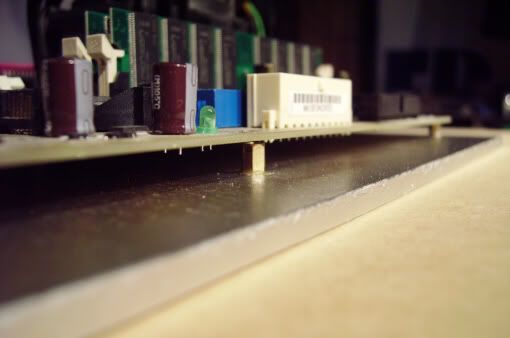
Motherboard stand-offs were recycled from discarded PC's.

Thanks!
$1.99 Gutter Guard Screen for venting.
My 2nd piece of veneer. :( I guess you could say the first piece was a test...
Did you know that most wood veneer is only 1/42 of an inch thick?
I found these 50% off after Christmas @ Lowes last year. I just removed the outer lightbulb shaped plastic to make them fit. Alot cheaper than a custom programmable controller. (maybe down the road I'll upgrade)
Cavicchio Jukebox - Lighting Demo (http://www.youtube.com/watch?v=IUj86nOrRxIDTK9Y#)
Forgot to take a photo of the speakers before I disassembled them. So I included the mfg. photo.
I actually cut down the height of the left & right speakers.
Removed the volume/bass control from the speaker's base and made a new holder that I'll be relocating in the back.
The flashlight originally ran on (3)1.5 volt batteries or a total of 4.5 volts.
By inserting a 15ohm resistor, I was able to power the front emblem directly from the 5VDC tap coming from computer's power supply.
That Chinese flashlight put up one good fight.
Where else can you buy 9 white Leds & 3 AAA batteries for $2.00 ?
Motherboard stand-offs were recycled from discarded PC's.
Title: Re: Cavicchio Jukebox - Finally Done !
Post by: leeclark2612 on December 07, 2009, 06:06:30 AM
Post by: leeclark2612 on December 07, 2009, 06:06:30 AM
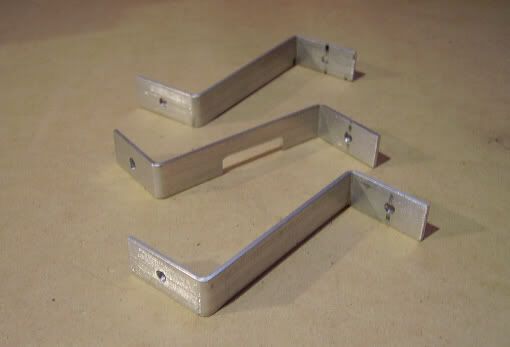
that is one good looking project! Nice work! One thing I will say, the hard drive should have some kind of rubber dampers conecting it to your mounting brackets...vibrations from the speaker system could make it defect quicker...
Title: Re: Cavicchio Jukebox - Finally Done !
Post by: caesar on December 07, 2009, 06:19:02 AM
Post by: caesar on December 07, 2009, 06:19:02 AM
Hello,
Good point...
Maybe some soft rubber material(washers) between the HD and the cabinet will help.
Thanks!
Good point...
Maybe some soft rubber material(washers) between the HD and the cabinet will help.
Thanks!
Title: Re: Cavicchio Jukebox - Finally Done !
Post by: jesperpark on December 07, 2009, 06:33:56 AM
Post by: jesperpark on December 07, 2009, 06:33:56 AM
Nice Work! I love the little subtle detail things you did to make the project stand out. ;D
Title: Re: Cavicchio Jukebox - Finally Done !
Post by: Barcrest on December 07, 2009, 08:21:13 AM
Post by: Barcrest on December 07, 2009, 08:21:13 AM
Quote from: caesar on December 07, 2009, 06:19:02 AM
Hello,
Good point...
Maybe some soft rubber material(washers) between the HD and the cabinet will help.
Thanks!
The should work fine, top quality build dude :beer
One question, are you running the demo?
Title: Re: Cavicchio Jukebox - Finally Done !
Post by: dilligas2u on December 07, 2009, 07:12:27 PM
Post by: dilligas2u on December 07, 2009, 07:12:27 PM
Nice Job! I wish I was that handy with tools.
Title: Re: Cavicchio Jukebox - Finally Done !
Post by: coffee on December 09, 2009, 08:23:40 PM
Post by: coffee on December 09, 2009, 08:23:40 PM
Wow, one very good piece of engineering. Well done.
Title: Re: Cavicchio Jukebox - Finally Done !
Post by: Novalak on December 10, 2009, 01:04:29 AM
Post by: Novalak on December 10, 2009, 01:04:29 AM
all i can say is WOW
makes mine look like a kiddy project
makes mine look like a kiddy project
Title: Re: Cavicchio Jukebox - Finally Done !
Post by: caesar on December 10, 2009, 03:03:01 AM
Post by: caesar on December 10, 2009, 03:03:01 AM
Quote from: Barcrest on December 07, 2009, 08:21:13 AMQuote from: caesar on December 07, 2009, 06:19:02 AM
Hello,
Good point...
Maybe some soft rubber material(washers) between the HD and the cabinet will help.
Thanks!
The should work fine, top quality build dude :beer
One question, are you running the demo?
Thanks Everyone, it's rewarding to hear positive feedback.
Yes Barry, It's the Demo version.
Please send me your e-mail address.
Thanks!
Title: Re: Cavicchio Jukebox - Finally Done !
Post by: coffee on December 10, 2009, 06:09:26 AM
Post by: coffee on December 10, 2009, 06:09:26 AM
Dude, you really should get the full version. It will compliment your allready awesome cab.
I still can't get around how good thought out and innevative your cabinet is.
I still can't get around how good thought out and innevative your cabinet is.
Title: Re: Cavicchio Jukebox - Finally Done !
Post by: leeclark2612 on December 10, 2009, 10:23:51 AM
Post by: leeclark2612 on December 10, 2009, 10:23:51 AM
that cab would look great with a small lcd under the main screen (for those who use videos too that is...) I agree with coffee, that's gotta be one of the best home made cabs I've ever seen!
Title: Re: Cavicchio Jukebox - Finally Done !
Post by: caesar on December 10, 2009, 12:08:58 PM
Post by: caesar on December 10, 2009, 12:08:58 PM
$ Merry Christmas Barry ! $
:beer
:beer
Title: Re: Cavicchio Jukebox - Finally Done !
Post by: caesar on December 10, 2009, 12:28:55 PM
Post by: caesar on December 10, 2009, 12:28:55 PM
I really, really like that idea ! ;D A 5" PSOne screen would be perfect.
But I think it may effect (block) the sound quality in my situation. Or it may be a short lived monitor because of the sub pounding behind it.
Definetly, If I build a full size floor model ! ;D
Thanks!
But I think it may effect (block) the sound quality in my situation. Or it may be a short lived monitor because of the sub pounding behind it.
Definetly, If I build a full size floor model ! ;D
Thanks!
Title: Re: Cavicchio Jukebox - Finally Done !
Post by: leeclark2612 on December 10, 2009, 12:32:38 PM
Post by: leeclark2612 on December 10, 2009, 12:32:38 PM
you could always vent the sub out the bottom of the cabinet and fix existing speaker enclosure to the inside of the cab face down...shouldn't be too much of a problem if it's sealed up...
Title: Re: Cavicchio Jukebox - Finally Done !
Post by: Barcrest on December 10, 2009, 01:01:20 PM
Post by: Barcrest on December 10, 2009, 01:01:20 PM
Quote from: caesar on December 10, 2009, 12:08:58 PM
$ Merry Christmas Barry ! $
:beer
Thanks dude :beer
Title: Re: Cavicchio Jukebox - Finally Done !
Post by: Barcrest on December 10, 2009, 01:02:24 PM
Post by: Barcrest on December 10, 2009, 01:02:24 PM
Quote from: leeclark2612 on December 10, 2009, 12:32:38 PM
you could always vent the sub out the bottom of the cabinet and fix existing speaker enclosure to the inside of the cab face down...shouldn't be too much of a problem if it's sealed up...
You need to see scatman's build he has done the dual screen thing in a simular sized cab. It does look good with the vis showing.
Title: Re: Cavicchio Jukebox - Finally Done !
Post by: ecbrad on December 11, 2009, 03:19:02 AM
Post by: ecbrad on December 11, 2009, 03:19:02 AM
Thats beautiful! I'd love a full size model of one of these!
Brad
Brad
Title: Re: Cavicchio Jukebox - Finally Done !
Post by: caesar on December 15, 2009, 12:16:58 PM
Post by: caesar on December 15, 2009, 12:16:58 PM
Hello,
I've received alot of e-mails regarding the assembly of the arch & columns.
Here's some general instructions...
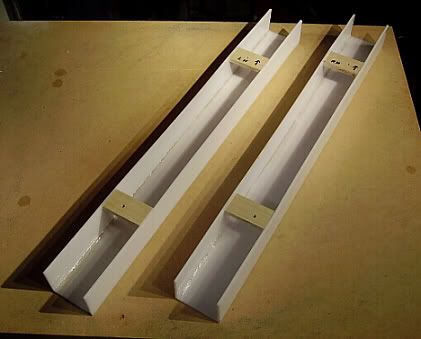
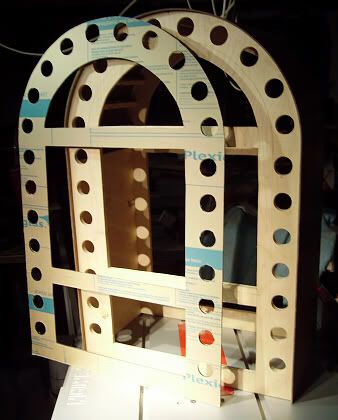
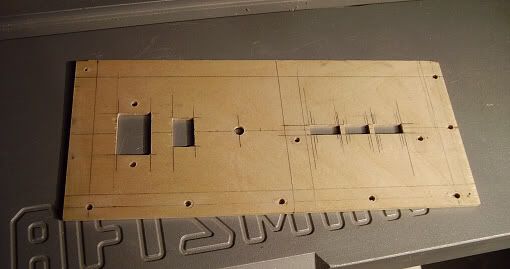
The straight columns are just butt jointed at 90*.
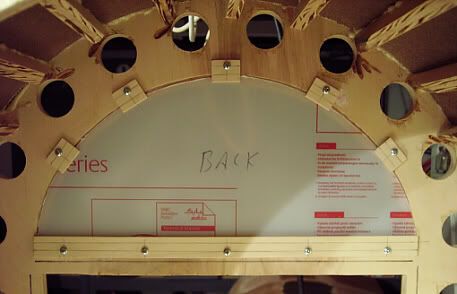
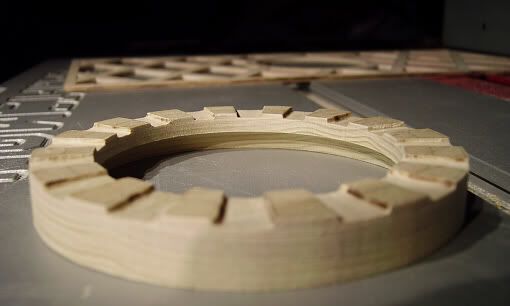
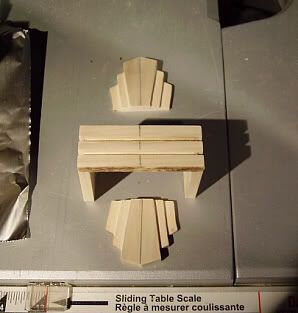
There are 3 pieces that make up the top arch.
1st the Face (the front side/part that you see).
2nd the top (top part of the arch that collects dust)
3rd the inside arch (bottom inside curve)
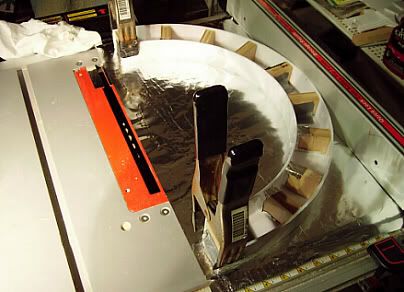
I first cut and sanded the Face piece to match the jukes arched cabinet.
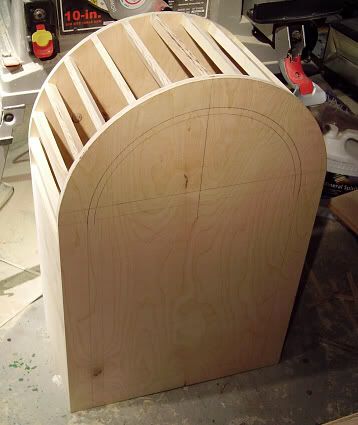
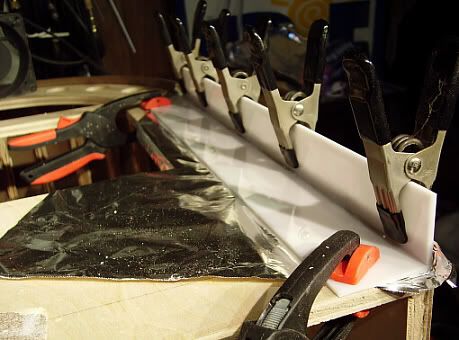
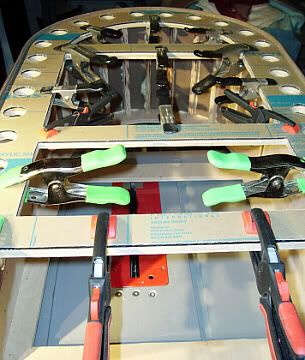
It was just a matter of butt jointing and cementing the top arch against the curved face. I warmed the top piece slightly and evenly with a heat gun to give it a bit more flex. If you don't already own alot of clamps, you soon will :)
Be sure you have no gaps in the joints of the polycarb or the cement will drip out. :(
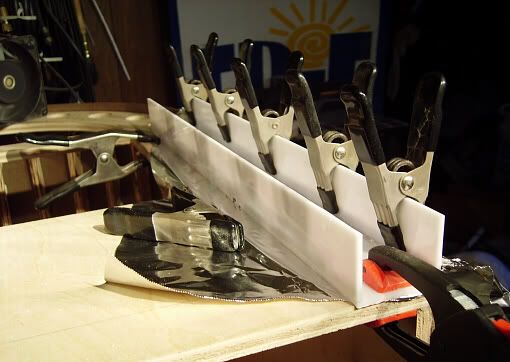
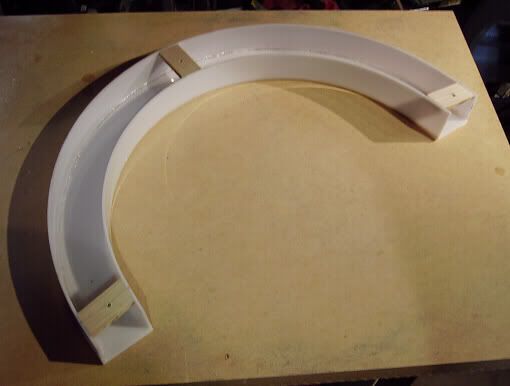
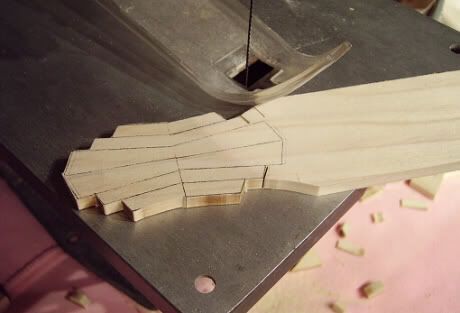
After the the face and top arch have had a week or so to dry. I then cut out about a dozen, forming square blocks.
Wrap the contact area of the blocks with aluminum foil so the cement doesn't adhere to the wood.
I placed each of the blocks up against the face and top plastics. Here's the tricky part.
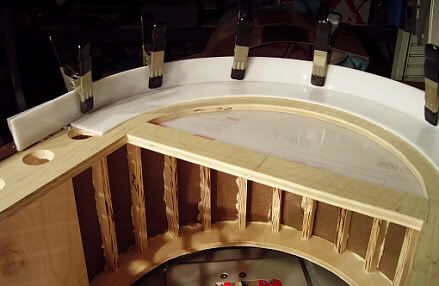
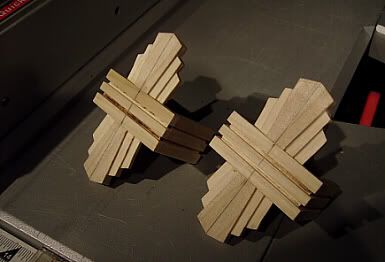
Warm up the inside piece for your arch. Then press the 3rd piece against the blocks inside the arch. The blocks will insure the arch is pretty much uniform. It's important that there are no gaps along the bottom (where the inside curve touches the arch's face piece.) Cement and wait 2-3 weeks before removing the forming blocks. Once you remove the forming blocks and any residual stuck on-foil, flip it over and you've got a custom homemade arch.
Practice assembling a few times before using the cement. http://www.ipscorp.com/assembly
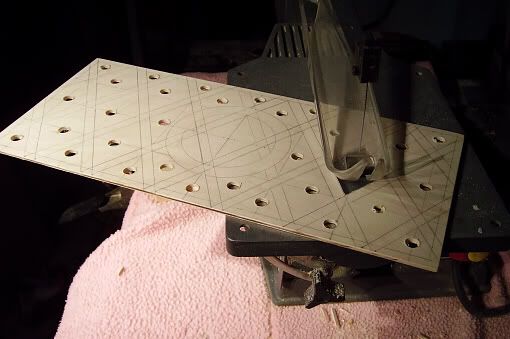
Cut your plastics 3-5 inches longer then you need. Once totally dry, you can always trim off the excess length. Make sure you use a new blade and cut very, very, slow. Make sure to scuff up the inside part of the plastics to help the cement. Don't worry about any bubbles in the cement, you won't see them unless you are using crystal clear plexi or clear polycarb.
I used the same cement once again to adhere my wood mounting brackets/blocks to the arch & columns. The columns & arch are screwed in from inside the cabinet.
Hope this is helpful... ;D
I've received alot of e-mails regarding the assembly of the arch & columns.
Here's some general instructions...
The straight columns are just butt jointed at 90*.
There are 3 pieces that make up the top arch.
1st the Face (the front side/part that you see).
2nd the top (top part of the arch that collects dust)
3rd the inside arch (bottom inside curve)
I first cut and sanded the Face piece to match the jukes arched cabinet.
It was just a matter of butt jointing and cementing the top arch against the curved face. I warmed the top piece slightly and evenly with a heat gun to give it a bit more flex. If you don't already own alot of clamps, you soon will :)
Be sure you have no gaps in the joints of the polycarb or the cement will drip out. :(
After the the face and top arch have had a week or so to dry. I then cut out about a dozen, forming square blocks.
Wrap the contact area of the blocks with aluminum foil so the cement doesn't adhere to the wood.
I placed each of the blocks up against the face and top plastics. Here's the tricky part.
Warm up the inside piece for your arch. Then press the 3rd piece against the blocks inside the arch. The blocks will insure the arch is pretty much uniform. It's important that there are no gaps along the bottom (where the inside curve touches the arch's face piece.) Cement and wait 2-3 weeks before removing the forming blocks. Once you remove the forming blocks and any residual stuck on-foil, flip it over and you've got a custom homemade arch.
Practice assembling a few times before using the cement. http://www.ipscorp.com/assembly
Cut your plastics 3-5 inches longer then you need. Once totally dry, you can always trim off the excess length. Make sure you use a new blade and cut very, very, slow. Make sure to scuff up the inside part of the plastics to help the cement. Don't worry about any bubbles in the cement, you won't see them unless you are using crystal clear plexi or clear polycarb.
I used the same cement once again to adhere my wood mounting brackets/blocks to the arch & columns. The columns & arch are screwed in from inside the cabinet.
Hope this is helpful... ;D
Title: Re: Cavicchio Jukebox - Finally Done !
Post by: sirk123au on December 17, 2009, 07:11:54 AM
Post by: sirk123au on December 17, 2009, 07:11:54 AM
Love the design mate do you think you could give me the dimensions??
That would be great if you would.
Ta Sirk
That would be great if you would.
Ta Sirk
Title: Re: Cavicchio Jukebox - Finally Done !
Post by: caesar on December 17, 2009, 12:22:03 PM
Post by: caesar on December 17, 2009, 12:22:03 PM
Happy Holidays! :beer
The overall cab Height is 31 3/4 inches (80.6 cm)
Cab front Width is 20 1/4 inches (51.4 cm)
Just the wood cab Depth (front to back) is 11 5/8 inches (29.5 cm) If you include the plastic column it's overall 13 inches (33 cm).
Keep in mind the bottom of the cabinet extends forward to support the columns.
The 4 maple feet are 2 inches(5.1 cm) round & 3/4 inches(1.9 cm) thick.
Thanks!
Title: Re: Cavicchio Jukebox - Finally Done !
Post by: Rob_Hendley on December 17, 2009, 07:23:30 PM
Post by: Rob_Hendley on December 17, 2009, 07:23:30 PM
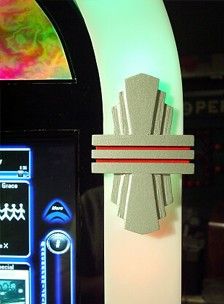
Mate that looks like smart work - was gonna ask where you bought the ornaments from until i saw you had made them from wood.
Im just working on my cab at the mo - inspired by an old AMI juke. Brought it up from the garage on Monday night and the MDF has all shrunk slightly - maybe a half mm between the panels? Covering it all up though, so won't make much difference.
Im just working on my cab at the mo - inspired by an old AMI juke. Brought it up from the garage on Monday night and the MDF has all shrunk slightly - maybe a half mm between the panels? Covering it all up though, so won't make much difference.
Title: Re: Cavicchio Jukebox - Finally Done !
Post by: caesar on December 18, 2009, 12:53:30 AM
Post by: caesar on December 18, 2009, 12:53:30 AM
Hello !
I'm kind of a vintage jukebox nut...
What AMI model inspired you?
A "full size" or a "mini size" build?
Thanks!
I'm kind of a vintage jukebox nut...
What AMI model inspired you?
A "full size" or a "mini size" build?
Thanks!
Title: Re: Cavicchio Jukebox - Finally Done !
Post by: Rob_Hendley on December 20, 2009, 06:21:10 PM
Post by: Rob_Hendley on December 20, 2009, 06:21:10 PM
Full size build old pal - based on an AMI I200E without the glass front as shown here:

This was mine this morning:

This is the juke laid bare. The top three holes are for speakers - front centre, left, right of the 5.1 system and the bottom ones will be setup for the rear speakers and sub.
The middle bit under the monitor hole sticks out and there are more bits to fit on the sides to continue it around, similar to the AMI
Spent all day today applying black wood effect vinyl to the cabinet and silver speaker cloth and was left with this:

I will put the same speaker cloth around the top speakers, finishing them both with a polished aluminium edging like the AMI has. I gotta order some 1.5 mm aluminium sheet from ebay as I have a logo design for the front where the silver cloth is. I'll cut it out with a scroll saw and fix it somehow.
Gotta spend a weekend cutting and polishing angle aluminium to all of the edges to protect them and add a bit if bling.
The middle sticky out part will be marble effect with a polished aluminium edge and some kind of design/lettering around it. Got some ideas, but nothing I would like to disclose just yet!
The bottom will have some kind of skirt around it, but not yet sure what. Angled, raised (to continue the theme of the middle bit) or just flat, but ill figure it out.
Ill put up some more pics as the build progresses. It looks a bit pants at the moment, but it's getting there!
This was mine this morning:
This is the juke laid bare. The top three holes are for speakers - front centre, left, right of the 5.1 system and the bottom ones will be setup for the rear speakers and sub.
The middle bit under the monitor hole sticks out and there are more bits to fit on the sides to continue it around, similar to the AMI
Spent all day today applying black wood effect vinyl to the cabinet and silver speaker cloth and was left with this:
I will put the same speaker cloth around the top speakers, finishing them both with a polished aluminium edging like the AMI has. I gotta order some 1.5 mm aluminium sheet from ebay as I have a logo design for the front where the silver cloth is. I'll cut it out with a scroll saw and fix it somehow.
Gotta spend a weekend cutting and polishing angle aluminium to all of the edges to protect them and add a bit if bling.
The middle sticky out part will be marble effect with a polished aluminium edge and some kind of design/lettering around it. Got some ideas, but nothing I would like to disclose just yet!
The bottom will have some kind of skirt around it, but not yet sure what. Angled, raised (to continue the theme of the middle bit) or just flat, but ill figure it out.
Ill put up some more pics as the build progresses. It looks a bit pants at the moment, but it's getting there!
Title: Re: Cavicchio Jukebox - Finally Done !
Post by: caesar on March 28, 2010, 05:57:04 PM
Post by: caesar on March 28, 2010, 05:57:04 PM
Hello,
Responding to a few e-mail questions. :)
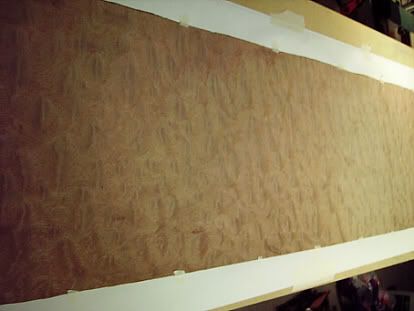
The veneer that I used is "Makore Pommele".
If your new to veneering, there's alot of good web reading to be done before attempting your first project.
Thanks! ;D
Responding to a few e-mail questions. :)
The veneer that I used is "Makore Pommele".
If your new to veneering, there's alot of good web reading to be done before attempting your first project.
Thanks! ;D
Title: Re: Cavicchio Jukebox - Finally Done !
Post by: barbosaa on May 04, 2011, 03:18:35 AM
Post by: barbosaa on May 04, 2011, 03:18:35 AM
Amazing Job! congratulations, what kind of white flexy plastic did you use to did the arche?
Thanks
Thanks
Title: Re: Cavicchio Jukebox - Finally Done !
Post by: caesar on May 05, 2011, 11:30:45 AM
Post by: caesar on May 05, 2011, 11:30:45 AM
Hello,
One option I had was to scuff the inside of Clear Plexiglas with fine sandpaper. I went to a small Mom & Pop sign making business and purchased a old scrap 3ft x 3ft sheet.
It was Makrolon Polycarbonate
http://www.makrolon.com/bms/db-rsc/makroloncmsr6.nsf/id/sheeting_en?opendocument
Here's a link for colored plexiglas. But try local sign businesses first, they may sell you some scrap pieces cheap... ;D
http://www.usplastic.com/catalog/item.aspx?itemid=23901
Thanks!
Title: Re: Cavicchio Jukebox - Finally Done !
Post by: A. Aston on June 11, 2013, 08:12:19 PM
Post by: A. Aston on June 11, 2013, 08:12:19 PM
Quote from: caesar on December 07, 2009, 05:41:53 AM
Here's the build... Please wait for pics to load...
Thanks!
$1.99 Gutter Guard Screen for venting.
My 2nd piece of veneer. :( I guess you could say the first piece was a test...
Did you know that most wood veneer is only 1/42 of an inch thick?
I found these 50% off after Christmas @ Lowes last year. I just removed the outer lightbulb shaped plastic to make them fit. Alot cheaper than a custom programmable controller. (maybe down the road I'll upgrade)
http://www.youtube.com/watch?v=SU1-LWDTK9Y (http://www.youtube.com/watch?v=SU1-LWDTK9Y)
http://www.youtube.com/watch?v=SU1-LWDTK9Y (http://www.youtube.com/watch?v=SU1-LWDTK9Y)
Forgot to take a photo of the speakers before I disassembled them. So I included the mfg. photo.
I actually cut down the height of the left & right speakers.
Removed the volume/bass control from the speaker's base and made a new holder that I'll be relocating in the back.
The cheap led flashlight (http://www.robustbuy.com/led-lighting-gadgets-led-flashlights-c-505_1027_730.html) originally ran on (3)1.5 volt batteries or a total of 4.5 volts.
By inserting a 15ohm resistor, I was able to power the front emblem directly from the 5VDC tap coming from computer's power supply.
That Chinese flashlight put up one good fight.
Where else can you buy 9 white Leds & 3 AAA batteries for $2.00 ?
Motherboard stand-offs were recycled from discarded PC's.

This is like awesome .. Putting all these things togather have done this for me. I have tried and got the result .. ;D
Title: Re: Cavicchio Jukebox - Finally Done !
Post by: caesar on July 20, 2013, 05:11:01 AM
Post by: caesar on July 20, 2013, 05:11:01 AM
Hello fellow DIY'ers,
Well, I had to change the name of my juke.
Apparently the previous name of my jukebox project got the attention and upset the biggest shark in the ocean. The letter from the law firm also said they were investigating whether it also constitutes design patent ingringement. :(
Well, I had to change the name of my juke.
Apparently the previous name of my jukebox project got the attention and upset the biggest shark in the ocean. The letter from the law firm also said they were investigating whether it also constitutes design patent ingringement. :(
Title: Re: Cavicchio Jukebox - Finally Done !
Post by: Barcrest on July 23, 2013, 08:18:30 AM
Post by: Barcrest on July 23, 2013, 08:18:30 AM
I had threats from BOSE a few years ago.
Title: Re: Cavicchio Jukebox - Finally Done !
Post by: caesar on July 24, 2013, 03:06:26 AM
Post by: caesar on July 24, 2013, 03:06:26 AM
Hello,
I've gotta keep reminding myself that I don't have a law firm on my payroll... :(
If anything, they should take some design advice from me.
I think their gear resembles (ATM) banking machines for prisoners...LOL ;D
DIY jukes rock ! :beer
None of my $ will be found in a commercial pukebox. LOL
I've gotta keep reminding myself that I don't have a law firm on my payroll... :(
If anything, they should take some design advice from me.
I think their gear resembles (ATM) banking machines for prisoners...LOL ;D
DIY jukes rock ! :beer
None of my $ will be found in a commercial pukebox. LOL